You may find out automatically which computer access your service, but if you want to identify the person, you will have to ask her.
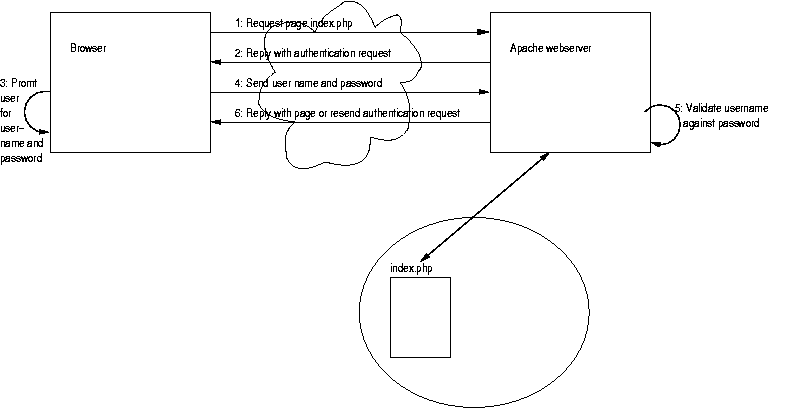
In this lecture we will show how to perform HTTP user authentication and custom PHP/MySQL authentication with sessions.
This is the method used for the Intranet at IT-C.
It may be triggered by a server-script (e.g. PHP) or directly by the Web server (e.g. Apache or IIS).
Here is the general picture:
index.php from the web-server
WWW-Authenticate: Basic realm="IT University Intranet"HTTP/1.0 401 Autherization Required
WWW-Authenticate: Basic realm="IT University Intranet" HTTP/1.0 401 Authorization Required <body> <h1>Invalid login/password</h1> You must provide a valid login and password to enter this site. <p> <hr> <address>Apache/1.3.20 Server at www.it-c.dk Port 80</address> </body> |
Cancel or e.g. fails too many times, the rest of the authentication page is
shownOk, the user name and password are send
(by default in plain text) to the web-server, which is then validated
It relies on the environment variables PHP_AUTH_USER
and
PHP_AUTH_PW.
<?
Passwords can be made secret using a one-way function.
We use the the cryptographic hash function MD5 (Rivest, 1992), also called a message digest.
It has the following four important properties:
md5("MyPass")=
md5("Homer")=
md5("NyPass")=
if ($PHP_AUTH_USER == "hilde" && md5($PHP_AUTH_PW); == "fb3f06c821388858cafe95cea24895d3") $auth = true; |
We might also want to allow new users to register, or old users to change passwords.
In this case we should store the password information in a database or in a file.We might create a Users table and inserte a couple of users as follows:
CREATE TABLE `Users` (
`name` CHAR(10) NOT NULL,
`passwd` CHAR(32) NOT NULL,
PRIMARY KEY (`name`),
UNIQUE (`name`)
)
INSERT INTO Users (name, passwd) VALUES
("Thomas",MD5("MyPass")),
("Homer",MD5("Homer"));
|
Note the use of MD5 in MySQL.
The following code implements a password check against the Users table, assuming that connect() makes a connection to the Database containing the table.
You may test it here.
You can avoid server-script programming, by using the Apache server's mod_auth authentication module and .htaccess files.
It is done by placing an
.htaccess file in a directory, which will control accesses to files and any subdirectories in this directory.

index.html from the web-server
.htaccess file in the path to the page
.htpass-file or a database.
index.html or resends the authentication request, depending on the result of the validation,.
The .htaccess file may look like
AuthUserFile /import/home/hilde/Webprogramming/.htpass AuthName "Web Programming Secret Pages" AuthType Basic require valid-user |
The line
AuthUserFile /import/home/hilde/Webprogramming/.htpass |
This page should NOT be in the web-tree...
The line
AuthName "Web Programming Secret Pages" |
The remaning lines
AuthType Basic require valid-user |
The file .htpass may look like
hilde:NRSDtsceWfu0I henrik:aiM.//KZIbzGo |
Note that the passwords are stored in encrypted form. You might perform the encryption yourself using the PHP
function crypt
Note that the crypt function uses a salt to generate the encryption.
In the .htpass file, the salt can be recovered as the two first characters of the encrypted string. (In fact the crypt function supports several encryption types, see here which encryption types are supported. Read more in the php manual).
We do not need to write a PHP script.
The password file can be automatically generated with the program htpasswd that comes with the Apache distribution.
Below is shown the steps I took to generate a password file with two users.
> htpasswd -bc .htpass hilde WP Adding password for user hilde > htpasswd -b .htpass henrik pass Adding password for user henrik > more .htpass hilde:NRSDtsceWfu0I henrik:aiM.//KZIbzGo |
c option tells htpasswd to generate a new file.b option tells htpasswd to expect the password as a parameter.
You may test the above authentication here. Try first not to provide a valid password.
Note that
.htacces file for an entire directory of files
mod_auth_mysql module, which uses a mysql database instead of a password file.
secret.php.
A cookie is introduced to the client by including a Set-Cookie header as part of an HTTP response. The header has the form:
Set-Cookie: NAME=VALUE; expires=DATE; path=PATH; domain=DOMAIN_NAME; secure |
setcookie (string NAME [, string VALUE [,int EXPIRE [,string PATH [, string DOMAIN_NAME [,int secure]]]]]) as illustrated in the example below.
<?
setcookie ("pass", $pass,time()+600);    /* expires in 10 minutes */
setcookie ("user", $user,time()+600);    /* expires in 10 minutes */
?>
|
You delete cookies again by calling the function setcookie() with the same name, but without a value. This sets a header with the same name (and path), but an expires time in the past.
<?
setcookie ("pass");
setcookie ("user");
?>
|
Since cookies are set by headers it is important not to set them before any other data is output. Moreover, cookie headers must be set before any other headers, as e.g. the authentication header.
You can read more about cookies in the specification at Netscape's site.
It is generally not a good idea to store the password and other sensitive data in a cookie.
Instead one should generate a unique session ID, and only store this session ID at the client. At the server one then records which user-specific data is related to this session ID. When the user logs out (or after a certain period of time) this information on the server can be deleted.

However, they might be set by GET and POST data, if they are not set already. Use the function session_is_registered("pass") instead of isset("pass").
The behaviour of PHP-sessions depends on a number of parameter settings in the configuration of PHP (defined in the php.ini file).
As usual, you can see the values by calling phpinfo();
session.cookie_lifetime: Lifetime of cookie in seconds. Value 0 (default) means until browser (all windows) is closed.
session.use_cookies: Whether to user cookies or URL parameters.
register_globals: If "On" you can register all global variables, and access the variables as usual, as in the example above.
If "Off", you can only use entries of the associative array $HTTP_SESSION_VARS (or $_SESSION from PHP 4.1.0) as session variables, e.g. $HTTP_SESSION_VARS["pass"]. These variables do not need to be registered and unregistered.
session.use_trans_sid: If true (1) the session Id is embedded automatically in the local URLs.
session.save_handler: Default set to "files". You can implement your own handler methods, e.g. to use a database - useful if sessions should work cross several web-servers.
You can change many of the configuration parameters for the duration
of a script using the ini_set()
function. The session parameters can also be changed using specialised
functions, e.g. session_set_cookie_params(int
lifetime [, string path [, string domain [, bool secure])
page1.php below
<?
 session_start();

 session_register("name","pass");

 if (session_is_registered("pass") && session_is_registered("name"))
     echo "<h1>name and password variables registered</h1>";

 $name = "hilde";
 $pass = "mypassword";

 echo "<h1>Session variables set!</h1>";
 echo "<a href=\"page2.php\">go to next page</a>";

?>
|
The next page,
page2.php, might look like
<?
 session_start();

 echo "<h1>The password of $name is $pass </h1>";

 session_unregister("pass");

 echo "<h2>password unregistered </h2>";

 echo "<a href=\"page3.php\">go to next page</a>";

?>
|
session_unset();.
In the third page, page3.php, we do not have access to the variable pass anymore.
<?
 session_start();
 echo "<h2>name is  $name </h2>";

 echo "<h2>password is  $pass </h2>";

 session_unregister("name");

 echo "Name unregistered, but name is set to $name until end of this script...";

 session_destroy();
 echo "<a href=\"page4.php\">go to next page</a>";

?>
|
page4.php
<? session_start(); echo "<h2>name is $name </h2>"; echo "<h2>password is $pass </h2>"; session_destroy(); echo "<a href=\"page1.php\">go back to page 1</a>"; ?> |
It uses
You can test the Personal Phone Book here.
You should use HTTP on top of SSL (HTTPS) if you are handling sensible data.

SSL uses public-key encryption (slow, but secure) to establish a connection (the SSL handshake) and uses symmetric key encryption (fast, not as secure) after the connection has been established. If RSA Key Exchange is used the handshake works as follows:
client_hello message containing the supported SSL version number and cipher algorithms
server_hello message, containg this information (and optionally request the browser to authenticate itself)
client_key_exchange message containing a 48 byte pre-master secret encrypted with the public key from the server certificate
You can read a more detailed Introduction to SSL (Sun) and look at netscape's site.
Extend the program with a PHP session such that the first line is written first time the script is requested by a user, and each time he request it subsequently the next line of the story is written. The story should start over after the last line "scary night." has been shown.